Analytics, Easyling, and You
This post has not been updated in a long time. The information may be out of date.
Google’s Analytics platform is a great tool for measuring site impact and coming up with new ways of improving your site. If your site is already using Analytics, you’ll be able to track both the original and the translated site with the same tracking code (in fact, this is already happening), but by default, Analytics will group the hits from both domains, original and translated, into the same view, and you’ll be unable to separate the impacts of both from one another. Fortunately, it is possible to set up Analytics to do just that for you!
If you already have a tracking code on your site, you’re already pumping data into Analytics. That same tracking code is replicated onto the translated site by Easyling when proxying the site. However, in its default setup, Google’s Analytics platform will collect all the visitor data under the same view, and only capture the page name the visitor is landing on, not the domain name under which the visitor is viewing the page, which means that a visit to the original site and the translated site will show up as two visits, but to the same page, meaning you can’t accurately judge the effect the translated site has on your impact.
If you want to have a complete picture of your site’s visitors, including which domain they’re using to reach your site, you’ll have to set up a custom view in Analytics, and specify a filter to override the page attribute (properly called the Request URI in Analytics) to include the domain (hostname) as well. Once you do that, however, you won’t be able to go back to the old way (should you want to), so before setting up the filter, it’s good practice to clone the view and work on the clone.
1. Setting up the Analytics account
If you already have an Analytics account to measure the impact of your original site, you can skip this step.
Otherwise, the first step is to set up a tracking ID on Google Analytics. We recommend using the new Universal Analytics, which will grant you more comprehensive access to your data. If you’ve already done this, and you’re tracking visits, feel free to skip this step.
[caption id=“attachment_878” align=“aligncenter” width=“1351”] Create the new tracking ID, using any combination of settings you want. We recommend using the new Universal Analytics to get the most out of your data.[/caption]
Once you get your tracking code, copy and paste the displayed snippet into the header of your page (the area just before the tag in the page source code). You’ll need to do this for every page you’re looking to track. If you’re using templates to create your pages, you’re best off by editing the template directly to include the code, while smaller sites may get away by hand-modifying the pages.
Please Note: If you already have a tracking script, you need to remove any reference to a function called “_setDomainName”. Leaving this in the script will cause Analytics to report any hits on the proxied site as if it went to the original site.
[caption id=“attachment_874” align=“aligncenter” width=“1358”]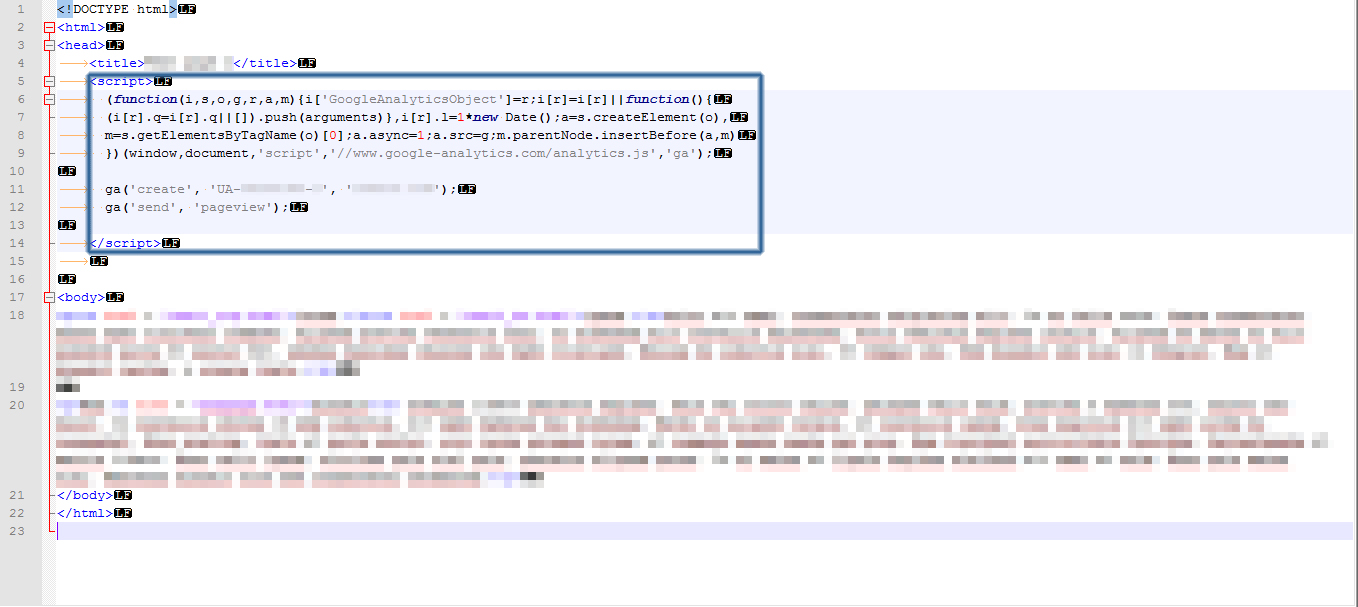 Add the tracking snippet to all the pages you want to track. If you’re using a CMS, you can modify your template to include the code in the header on all pages, or you can edit your pages by hand (as in this example).[/caption]
2. Creating the custom view
Once the tracking code is in place, you’re mostly set: your site is registering hits, from both domains. All that is needed is a little configuration to see the domains, not just the URI.
Create a new view by going to the Admin tab, and selecting the property containing your site. While you can do all this without creating a new view, it’s certainly advisable, since you’ll be replacing one of the default fields.
[caption id=“attachment_877” align=“aligncenter” width=“1357”]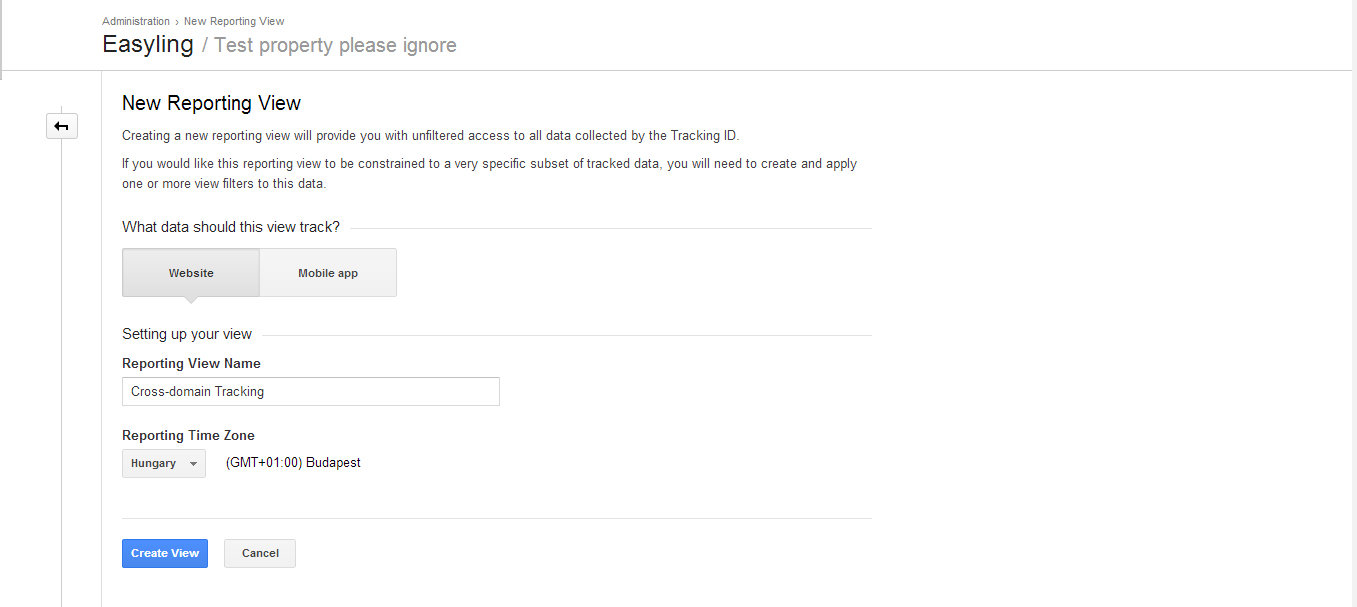 Create a new view to enable complete cross-domain tracking without affecting your usual view settings. While you can use the main view, this is safer and more flexible.[/caption]
Once the new view is created, add a Filter to it: select “Custom filter”, and specify “Advanced”. In the constructor you’re presented with, select “Hostname” for the A field, and “Request URI” for B, as well as the output constructor. Enter “(.*)” into the capture fields for both fields, and “$A1$B1” into the output field. This will take the hostname (the domain), then the request URI (the page), chain them together, and replace the original page with the new field, which shows the full URL used to reach that page.
[caption id=“attachment_876” align=“aligncenter” width=“1350”]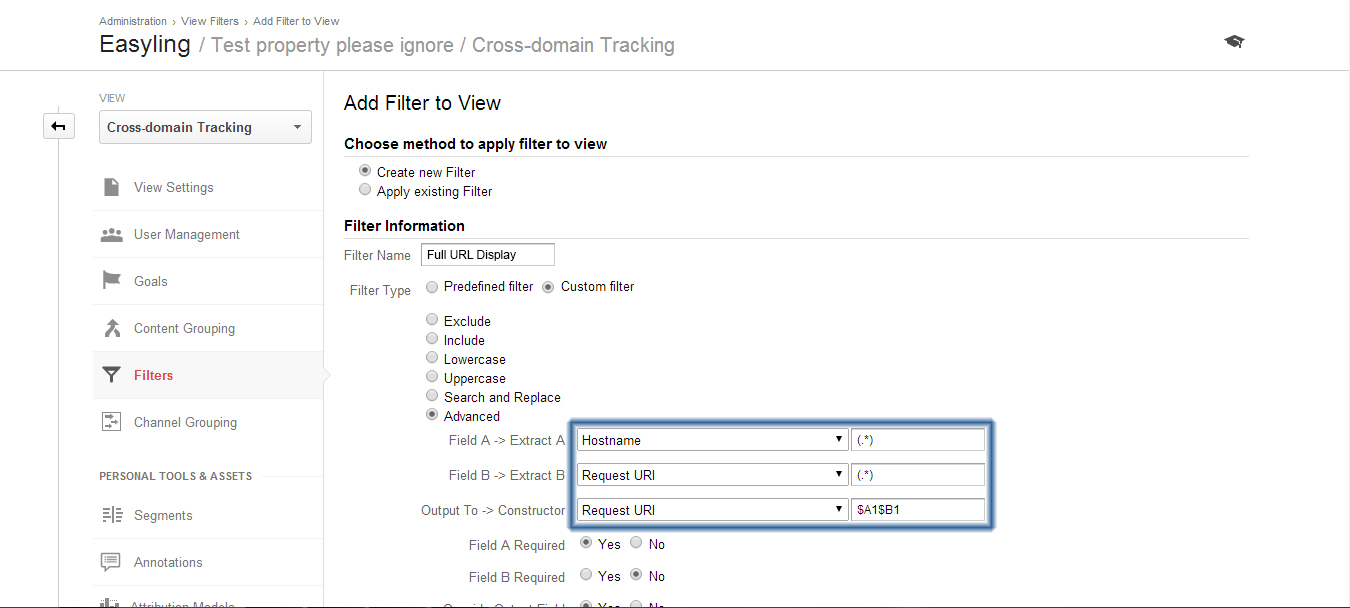 By overriding the default Request URI (the Page) field with this construct, you force Analytics to display the entire URL, including the domain, for a more accurate picture of visitor destinations.[/caption]
Using the view you just created, you’ll see the full URLs in your reports. This will allow you to determine just how much of the traffic is being generated by the translated site, and if you have multiple languages served by Easyling, to determine which language generates how much traffic. A similar, but not identical, effect can be achieved by specifying the page as the primary dimension of your report, then hostname as the secondary dimension.
[caption id=“attachment_875” align=“aligncenter” width=“1355”]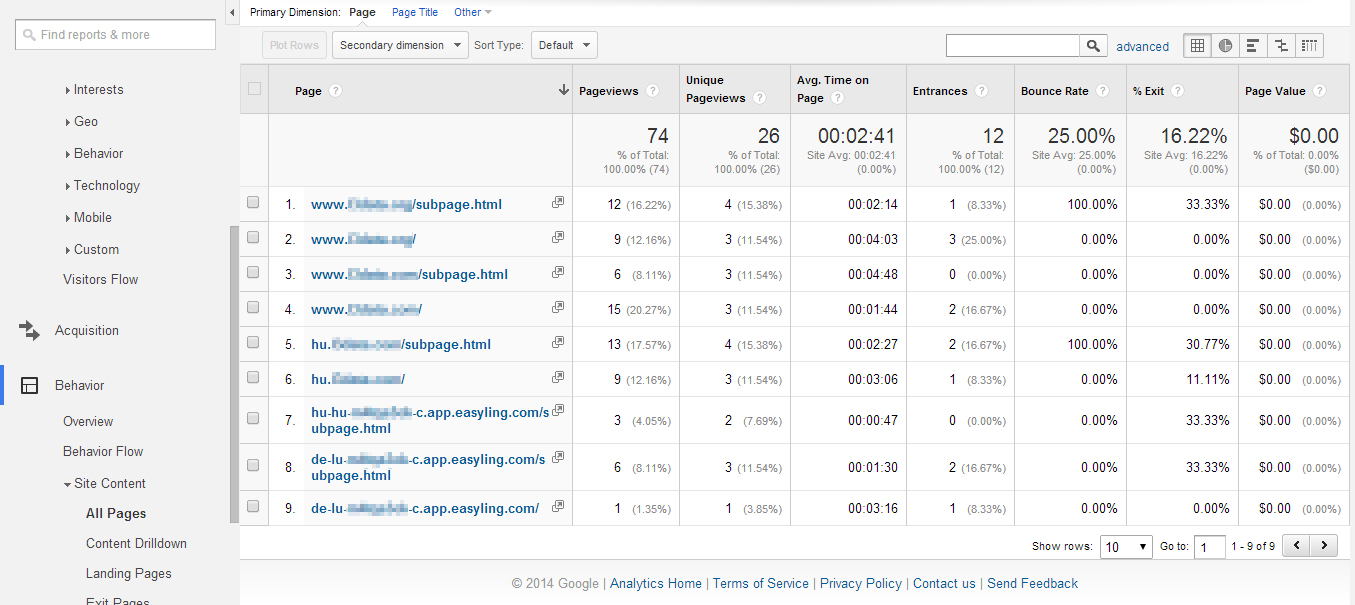 All reports from the Cross-domain view you created now display the full URL used to reach the pages of your site, so you can evaluate the impact your translations have on your traffic.[/caption]
There you have it! Any reports generated using this view will allow the separation of traffic by domain (and consequently, by language), all with the use of a single tracking ID.
Ready to build your website localization infrastructure?
Book a free consultation with Easyling's solution experts. We'll review your website, your current setup, content volume and your goals. No generic demo. No sales deck. A real conversation about your project. Including a live translation preview of your own site.
Book a free consultation